Server Properties Explained
Edit Server Properties
The Edit Server Properties page allows you to view and edit properties for that Server. Click on a heading on the Edit Server Properties page to expand or collapse a section of properties. This section details the specifics of each section.
General Server Properties
The general Server properties identify the Server and allow you to set Encryption.
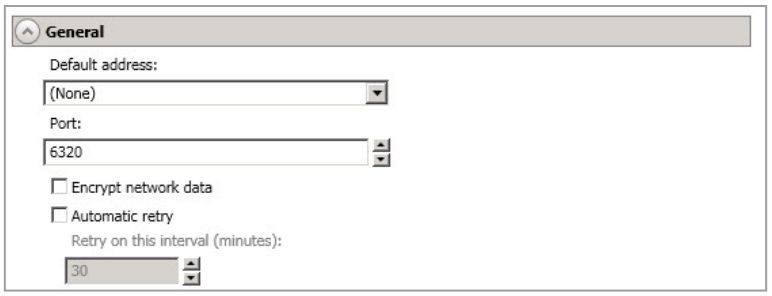
- Default Address - On a Server with multiple NICs, you can specify which address SyncSafe Replication traffic will use. It can also be used on Servers with multiple IP addresses on a single NIC. If you change this setting, you must restart the Double-Take Service for this change to take effect.
- Port - The Server uses this port to send and receive commands and operations between SyncSafe Replication Servers. If you change the port, you must stop and restart the DoubleTake service.
- Encrypt Network Data - Use this option to encrypt your data before it is sent from the source to the target. Both the source and target must be encryption capable ( version 7.0.1 or later), however this option only needs to be enabled on the source or target in order to encrypt data. Keep in mind that all jobs from a source with this option enabled or to a target with this option enabled will have the same encryption setting. Changing this option will cause jobs to auto-reconnect and possibly remirror. The encryption method used is AES-256.
- Certificate Subject Name - For Windows Servers, if you want to use your own secure certificate, you should obtain and install a certificate from an enterprise or commercial Certificate Authority. Once a certificate is installed in the Windows certificate store, you can select it from the Certificate Subject Name list. You will be responsible for updating an expired certificate as needed. If you want to revoke a certificate, you must remove it from the Server. If a selected certificate is expired or revoked, SyncSafe Replication will not replicate data.
- Automatic Retry - This option will have the target Server automatically retry Server login credentials for a job after the specified retry interval if the Server login credentials are not initially accepted. Keep in mind the following caveats when using this option:
- Because Server logins for a job are controlled by the target, this setting is only applicable to target Servers. This is only for Server credentials, not job credentials.
- Verify your Environment's security policy when using this option. Check your policies for failed login lock outs and resets. For example, if your policy is to reset the failed login attempt count after 30 minutes, set this auto-retry option to the same or a slightly larger value as the 30 minute security policy to decrease the chance of a lockout.
- Retry On This Interval - If you have enabled the automatic retry, specify the length of time, in minutes, to retry the login.
Server Licensing
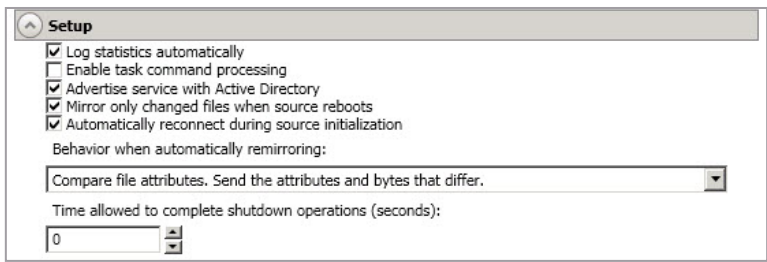
Licensing identifies your SyncSafe Replication license keys.
Note
The fields and buttons in the Licensing section will vary depending on your SyncSafe Replication Console configuration and the type of license keys you are using.
- Add License Keys And Activation Keys - Your license key or activation key is a 24 character, alpha-numeric key. You can change your license key without reinstalling if your license changes. To add a license key or activation key, type in the key or click
Choose From Inventoryand select a key from your console's license inventory. Then clickAdd. - Current License Keys - The Server's current license key information is displayed. To remove a key, highlight it and click
Remove. To copy a key, highlight it and click Copy. To replace a key, enter a new key and click Add. If you are replacing an unexpired key with the same version and serial number, you should not have to reactivate it and any existing jobs will continue uninterrupted. If you are replacing an unexpired key with a new version or new serial number or replacing an expired key, you will have to reactivate and remirror. -
Activation - If your license key needs to be activated, you will see an additional
Activationsection at the bottom of theLicensingsection. To activate your key, use one of the following procedures:- Activate Online - If you have Internet access, you can activate your license and apply the activated license to the Server in one step by selecting
Activate Online.
Note
You will not be able to activate a license if it has already been activated.
- Obtain Activation Key Online, Then Activate - If you have Internet access, click the hyperlink in the
Activationsection to take you to the web so that you can submit your activation information. Complete and submit the activation form, and you will receive an e-mail with the activation key. Activate your Server by entering the activation key in theAdd License Keys And Activations Keysfield and clickingAdd. - Obtain Activation Key Offline, Then Activate - If you do not have Internet access, go to https://activate.doubletake.com from another machine that has Internet access. Complete and submit the activation form, and you will receive an e-mail with the activation key. Activate your Server by entering the activation key in the
Add License Keys And Activations Keysfield and clickingAdd.
Note
- The activation key is specific to the Server you are adding the license to. It cannot be used on any other Server. If the activation key and Server do not match, SyncSafe Replication will not run.
- If your SyncSafe Replication license keys needs to be activated, you will have 14 daysto do so.
- If you need to rename a Server that already has a SyncSafe Replication license applied to it, you should deactivate that license before changing the Server name. That includes rebuilding a Server or changing the case (capitalization) of the Server name (upper or lower case or any combination of case). If you have already rebuilt the Server or changed the Server name or case, you will have to perform a host-transfer to continue using that license.
- Activate Online - If you have Internet access, you can activate your license and apply the activated license to the Server in one step by selecting
Server Setup Properties
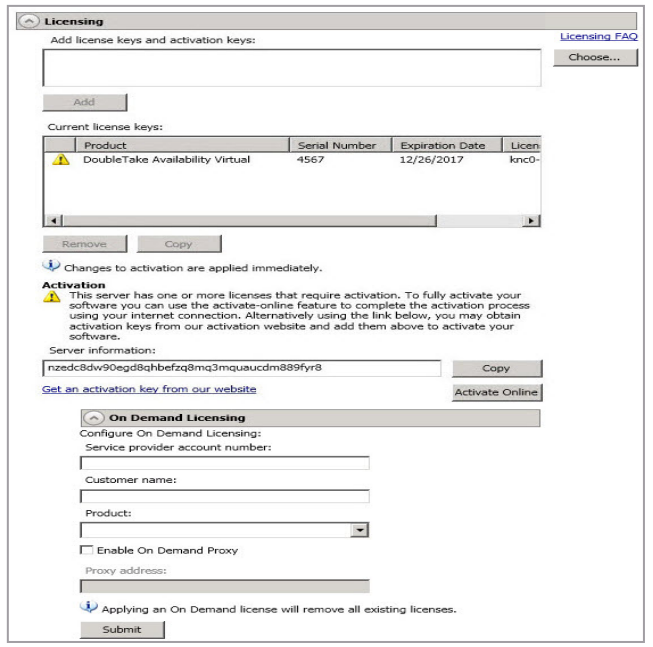
Server Setup Properties indicate how the Server will act on startup and shutdown.
-
Log Statistics Automatically - If enabled, SyncSafe Replication statistics logging will start automatically when SyncSafe Replication is started.
-
Enable Task Command Processing - Task command processing is a SyncSafe Replication feature that allows you to insert and run tasks at various points during the replication of data.
-
Because the tasks are user-defined, you can achieve a wide variety of goals with this feature. For example, you might insert a task to create a snapshot or run a backup on the target after a certain segment of data from the source has been applied on the target. This allows you to coordinate a point-in-time backup with real-time replication. Enable this option to enable task command processing, however to insert your tasks, you must use the SyncSafe Replication scripting language. See the Scripting Guide for more information. If you disable this option on a source Server, you can still submit tasks to be processed on a target, although task command processing must be enabled on the target.
- Advertise Service With Active Directory - For Servers in a domain, if this option is enabled, the Double-Take service registers with Windows Active Directory when the service is started.
- Mirror only changed files when source reboots—If enabled, SyncSafe Replication will use the SyncSafe Replication driver change journal to track file changes. If the source is rebooted, only the files identified in the change journal will be remirrored to the target. This setting helps improve mirror times. If this option is enabled but the change journal cannot be used or if this option is disabled, the selected choice for Behavior when automatically remirroring will be used to remirror changes after the source reboots.
- If you reboot your source into safe mode and changes are made to the protected data and then the source is rebooted normally, the SyncSafe Replication driver change journal will try but not be able to synchronize the source and target correctly because it was not loaded in safe mode. Therefore, you should manually start a difference mirror.
-
Automatically Reconnect During Source Initialization - Disk queues are user configurable and can be extensive, but they are limited. If the amount of disk space specified for disk queuing is met, additional data would not be added to the queue and data would be lost. To avoid any data loss, SyncSafe Replication will automatically disconnect jobs when necessary. If this option is enabled, SyncSafe Replication will automatically reconnect any jobs that it automatically disconnected.
Warning
It is strongly advised that you do not disable the auto-remirror feature to ensure that data integrity is preserved. These processes are called auto-disconnect and auto-reconnect and can happen in the following scenarios:
-
Source Server Restart - If your source Server is restarted, SyncSafe Replication will automatically reconnect any jobs that were previously connected. Then, if configured, SyncSafe Replication will automatically remirror the data.
-
Exhausted Queues On The Source - If disk queuing is exhausted on the source, SyncSafe Replication will automatically start disconnecting jobs. This is called auto-disconnect. The transaction logs and system memory are flushed allowing SyncSafe Replication to begin processing anew. The auto-reconnect process ensures that any jobs that were auto-disconnected are automatically reconnected. Then, if configured, SyncSafe Replication will automatically remirror the data.
-
Exhausted Queues On The Target - If disk queuing is exhausted on the target, the target instructs the source to pause. The source will automatically stop transmitting data to the target and will queue the data changes. When the target recovers, it will automatically tell the source to resume sending data. If the target does not recover by the time the source queues are exhausted, the source will auto-disconnect as described above. The transaction logs and system memory from the source will be flushed then SyncSafe Replication will auto-reconnect. If configured, SyncSafe Replication will auto-remirror.
-
Queuing Errors - If there are errors during disk queuing on either the source or target, for example, SyncSafe Replication cannot read from or write to the transaction log file, the data integrity cannot be guaranteed. To prevent any loss of data, the source will auto-disconnect and auto-reconnect. If configured, SyncSafe Replication will auto-remirror.
-
Target Server Interruption - If a target machine experiences an interruption (such as a cable or NIC failure), the source/target network connection is physically broken but both the source and target maintain the connection information. The SyncSafe Replication source, not being able to communicate with the SyncSafe Replication target, stops transmitting data to the target and queues the data changes, similar to the exhausted target queues described above. When the interruption is resolved and the physical source/target connection is reestablished, the source begins sending the queued data to the target. If the source/target connection is not reestablished by the time the source queues are exhausted, the source will auto-disconnect as described above.
-
Target Service Shutdown - If the target service is stopped and restarted, there could have been data in the target queue when the service was stopped. To prevent any loss of data, the Double-Take service will attempt to persist to disk important target connection information (such as the source and target IP addresses for the connection, various target queue information, the last acknowledged operation, data in memory moved to disk, and so on) before the service is stopped. If SyncSafe Replication is able to successfully persist this information, when the Double-Take service on the target is restarted, SyncSafe Replication will pick up where it left off, without requiring an auto-disconnect, auto-reconnect, or auto-remirror. If SyncSafe Replication cannot successfully persist this information prior to the restart (for example, a Server crash or power failure where the target service cannot shutdown gracefully), the source will auto-reconnect when the target is available, and if configured, SyncSafe Replication will auto-remirror.
Note
If you are using a database application or are protecting a domain controller, do not use the compare file attributes only options unless you know for certain that you need it. With database applications and because domain controllers store their data in a database, it is critical that all files, not just some of the files, are mirrored. In this case,you should compare both the attributes and the data. __
Warning
It is strongly recommended that Domain Controllers be protected by having multiple domain controllers, including pilot light domain controllers in diverse data center locations. Recovery of Domain Controllers under most circumstances should be performed by following Microsoft best practices relating to the movement of FSMO roles to an alternate Domain Controller for continuity of service.__*
-
Behavior When Automatically Remirroring - Specify how SyncSafe Replication will perform the mirror when it is automatically remirroring.
-
Do Not Compare Files. Send The Entire File. - SyncSafe Replication will not perform any comparisons between the files on the source and target. All files will be mirrored to the target, sending the entire file.
-
Compare File Attributes. Send The Entire File. - SyncSafe Replication will compare file attributes and will mirror those files that have different attributes, sending the entire file.
-
Compare File Attributes. Send The Attributes And Bytes That Differ. - SyncSafe Replication will compare file attributes and will mirror only the attributes and bytes that are different.
-
Compare File Attributes And Data. Send The Attributes And Bytes That Differ. - SyncSafe Replication will compare file attributes and the file data and will mirror only the attributes and bytes that are different.
-
Time Allowed To Complete Shutdown Operations - This setting indicates the amount of time, in seconds, for the Double-Take service to wait prior to completing a shutdown so that SyncSafe Replication can persist data on the target in an attempt to avoid a remirror when the target comes back online. A timeout of zero (0) indicates waiting indefinitely and any other number indicates the number of seconds. The timeout setting only controls the service shutdown caused by SyncSafe Replication. It does not control the service shutdown through a reboot or from the Service Control Manager.
-
SyncSafe Replication Queue
During the SyncSafe Replication installation, you identified the amount of disk space that can be used for SyncSafe Replication queuing. Queuing to disk allows SyncSafe Replication to accommodate high volume processing that might otherwise exhaust system memory. For example, on the source, this may occur if the data is changing faster than it can be transmitted to the target, or on the target, a locked file might cause processing to back up.
The following diagram will help you understand how queuing works. Each numbered step is described after the diagram.
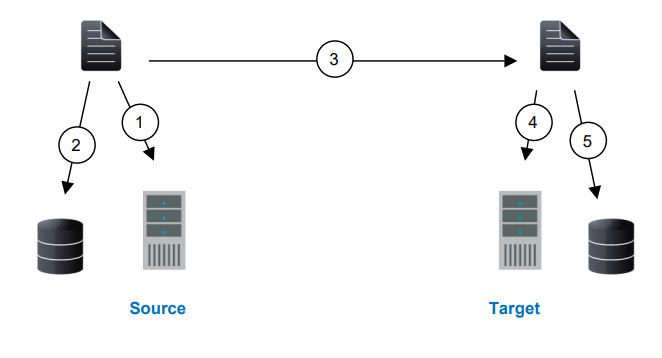
- If data cannot immediately be transmitted to the target, it is stored in system memory. You can configure how much system memory you want SyncSafe Replication to use for all of its processing.
- When the allocated amount of system memory is full, new changed data bypasses the full system memory and is queued directly to disk. Data queued to disk is written to a transaction log. Each transaction log can store 5 MB worth of data. Once the log file limit has been reached, a new transaction log is created. The logs can be distinguished by the file name which includes the target IP address, the SyncSafe Replication port, the connection ID, and an incrementing sequence number.
- You may notice transaction log files that are not the defined size limit. This is because data operations are not split. For example, if a transaction log has 10 KB left until the limit and the next operation to be applied to that file is greater than 10 KB, a new transaction log file will be created to store that next operation. Also, if one operation is larger than the defined size limit, the entire operation will be written to one transaction log.
- When system memory is full, the most recent changed data is added to the disk queue, as described in step 2. This means that system memory contains the oldest data. Therefore, when data is transmitted to the target, SyncSafe Replication pulls the data from system memory and sends it. This ensures that the data is transmitted to the target in the same order it was changed on the source. SyncSafe Replication automatically reads operations from the oldest transaction log file into system memory. As a transaction log is depleted, it is deleted. When all of the transaction log files are deleted, data is again written directly to system memory (step 1).
- To ensure the integrity of the data on the target, the information must be applied in the same order as it was on the source. If there are any delays in processing, for example because of a locked file, a similar queuing process occurs on the target. Data that cannot immediately be applied is stored in system memory.
- When the allocated amount of system memory on the target is full, new incoming data bypasses the full system memory and is queued directly to disk. Data queued to disk is written to a transaction log. On the target, the transaction logs are identified with the source IP address, the SyncSafe Replication port, the connection ID, and an incrementing sequence number.
-
Like the source, system memory on the target contains the oldest data so when data is applied to the target, SyncSafe Replication pulls the data from system memory. SyncSafe Replication automatically moves operations from the oldest transaction log file to system memory. As a transaction log is depleted, it is deleted. When all of the transaction log files are deleted, data is again written directly to system memory (step 4).
The following memory and queue options are available for each SyncSafe Replication Server.
-
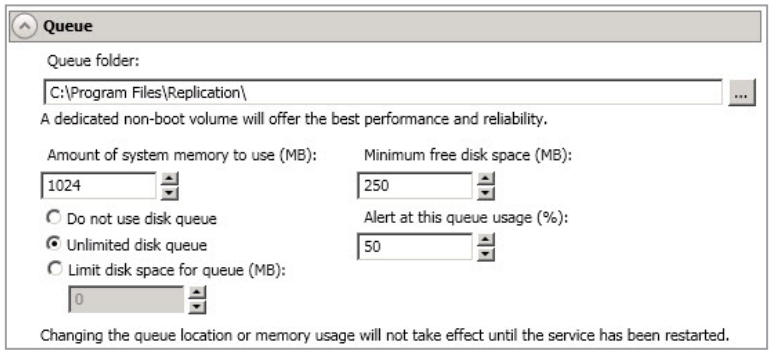
Queue Folder - This is the location where the disk queue will be stored. Any changes made to the queue location will not take effect until the Double-Take service has been restarted on the Server. When selecting the queue location, keep in mind the following caveats:
- Select an NTFS volume. Do not select a ReFS volume.
- Select a dedicated, non-boot volume.
- Do not select the same physical or logical volume as the data being replicated.
- Do not select the root of a volume.
- Select a location on a non-clustered volume that will have minimal impact on the operating system and applications.
- Select a location that is on a different volume as the location of the Windows pagefile.
- On a Windows 2012 or later Server, do not select a volume where deduplication is enabled.
Note
Optimizing a disk for write activity will benefit performance because the writes will typically be occurring when the Server is under a high load, and more reads will be occurring after the load is reduced. Accordingly, use a standalone disk, mirrored (RAID 1) or non-parity striped (RAID 0) RAID set, and allocate more I/O adapter cache memory to writes for best performance. A RAID 5 array will not perform as well as a mirrored or non-parity striped set because writing to a RAID 5 array incurs the overhead of generating and writing parity data. RAID 5 write performance can be up to 50% less than the write performance of a single disk, depending on the adapter and disk.
Note
Scanning the SyncSafe Replication queue files for viruses can cause unexpected results. If anti-virus software detects a virus in a queue file and deletes or moves it, data integrity on the target cannot be guaranteed. As long as you have your anti-virus software configured to protect the actual production data, the anti-virus software can clean, delete, or move an infected file and the clean, delete, or move will be replicated to the target. This will keep the target from becoming infected and will not impact the SyncSafe Replication queues.
-
Amount Of System Memory To Use - This is the maximum amount of Windows system memory, in MB, that SyncSafe Replication will use. When this limit is reached, queuing to disk will be triggered.
- The minimum amount of system memory is 512 MB. The maximum amount is dependent on the Server hardware and operating system. If you set this value lower, SyncSafe Replication will use less system memory, but you will queue to disk sooner which may impact system performance. If you set it higher, SyncSafe Replication will maximize system performance by not queuing to disk as soon, but the system may have to swap the memory to disk if the system memory is not available.
- Observe existing system memory usage and tune assigned memory for SyncSafe Replication according to utilization and swap activity. See the Implementation Prep for additional recommendations regarding sizing and performance best practices.
- Any changes to the memory usage will not take effect until the Double-Take service has been restarted on the Server.
- Do Not Use Disk Queue - This option will disable disk queuing. When system memory has been exhausted, SyncSafe Replication will automatically begin the auto-disconnect process.
- Unlimited Disk Queue - SyncSafe Replication will use an unlimited amount of disk space in the specified Queue Folder for disk queuing, which will allow the queue usage to automatically expand whenever the available disk space expands. When the available disk space has been used, SyncSafe Replication will automatically begin the auto-disconnect process.
- Limit Disk Space For Queue - This option will allow you to specify a fixed amount of disk space, in MB, in the specified Queue Folder that can be used for SyncSafe Replication disk queuing. When the disk space limit is reached, SyncSafe Replication will automatically begin the auto-disconnect process.
- Minimum free disk space—This is the minimum amount of disk space in the specified Queue Folder that must be available at all times. This amount should be less than the amount of physical disk space minus the disk size specified for Limit Disk Space For Queue.
- The Limit disk space for queue and Minimum free disk space settings work in conjunction with each other. For example, assume your queue is stored on a 10 GB disk with the Limit disk space for queue set to 10 GB and the Minimum free disk space set to 500 MB. If another program uses 5 GB, SyncSafe Replication will only be able to use 4.5 GB so that 500 MB remains free.
- Alert at this queue usage—This is the percentage of the disk queue that must be in use to trigger an alert message. By default, the alert will be generated when the queue reaches 50%.
Source Server Properties
Source Server Properties, as the name implies, are settings specific to the Source Server/workload, and will not be available or impact target systems.
-
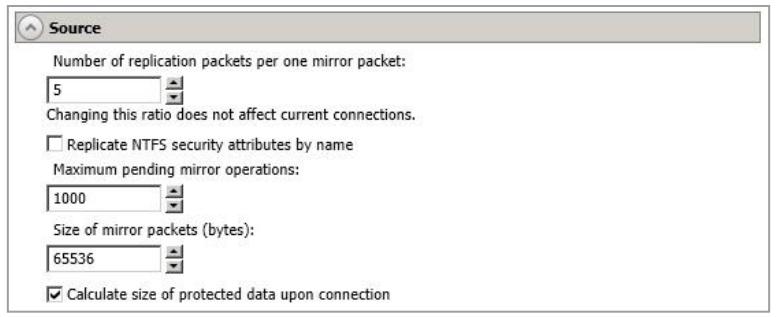
Number Of Replication Packets Per One Mirror Packet - You can specify the ratio of replication packets to mirror packets that are placed in the source queue. The default value (5) allows SyncSafe Replication to dynamically change the ratio as needed based on the amount of replication data in queue. If you set a specific value other than the default (other than 5), the specified value will be used. Changes to this setting will take effect for future jobs. Existing jobs will have to be stopped and restarted to pick up the new ratio.
-
Replication NTFS Security Attributes By Name - If you are protecting or migrating data, SyncSafe Replication allows you to replicate Windows permission attributes by local name as well as security ID (SID). By replicating Windows security by name, you can transmit the owner name with the file. If that user exists on the target, then the SID associated with the user will be applied to the target file ownership. If that user does not exist on the target, then the ownership will be unknown. By default, this option is disabled.
-
Domain Security Model - If you are using a Windows domain security model by assigning users at the domain level, each user is assigned a security ID (SID) at the domain level. When SyncSafe Replication replicates a file to the target, the SID is also replicated. Since a user will have the same SID on the source and target, the user will be able to access the file from the target. Therefore, this option is not necessary.
-
Local Security Model - If you are using a Windows local security model by assigning users at the local level (users that appear on multiple machine will each have different SIDs), you will need to enable this feature so that users can access the data on the target. If you do not enable this feature with a local security model, after a SyncSafe Replication file and SID is replicated, a local user will not be able to access the file because the user’s SID on the target machine is different from the SID that was replicated from the source machine.
-
-
If you enable the
Replication NTFS Security Attributes By Nameoption, make sure that the same groups and users exist on the target as they do on the source. Additionally, you must enable this option on your target Server before starting a restoration, because the target is acting like a source during a restoration. -
Enabling this option may have an impact on the rate at which SyncSafe Replication can commit data on the target. File security attributes are sent to the target during mirroring and replication. The target must obtain the security ID (SID) for the users and groups that are assigned permissions, which takes some time. If the users and groups are not on the target Server, the delay can be substantial. The performance impact of enabling this option will vary depending on the type of file activity and other variables. For instance, it will not affect the overall performance of large database files much (since there is a lot of data, but only a few file permissions), but may affect the performance of user files significantly (since there are often thousands of files, each with permissions). In general, the performance impact will only be noticed during mirrors since that is when the target workload is greatest.*
-
Regardless of the security model you are using, if you create new user accounts on the source, you should start a remirror so the new user account information associated with any files in your job can be transmitted to the target.
-
Maximum Pending Mirror Operations - This option is the maximum number of mirror operations that are queued on the source. The default setting is 1000. If, during mirroring, the mirror queued statistic regularly shows low numbers, for example, less than 50, this value can be increased to allow SyncSafe Replication to queue more data for transfer.
- Size Of Mirror Packets - This option determines the size of the mirror packets, in bytes, that SyncSafe Replication transmits. The default setting is 65536 bytes. You may want to consider increasing this value in a high latency environment (greater than 100 ms response times), or if your data set contains mainly larger files, like databases.
- Calculate Size Of Protected Data Upon Connection - Specify if you want SyncSafe Replication to determine the mirroring percentage calculation based on the amount of data being protected. If you enable this option, the calculation will begin when mirroring begins.
- For the initial mirror, the percentage will display after the calculation is complete, adjusting to the amount of the mirror that has completed during the time it took to complete the calculation.
- Subsequent mirrors will initially use the last calculated size and display an approximate percentage. \
- Once the calculation is complete, the percentage will automatically adjust down or up to indicate the amount that has been completed. Disabling calculation will result in the mirror status not showing the percentage complete or the number of bytes remaining to be mirrored.
Target Server Properties
Target Server Properties, similar to Source Server Properties, apply specifically to target Servers only and do not affect the source Servers.
-
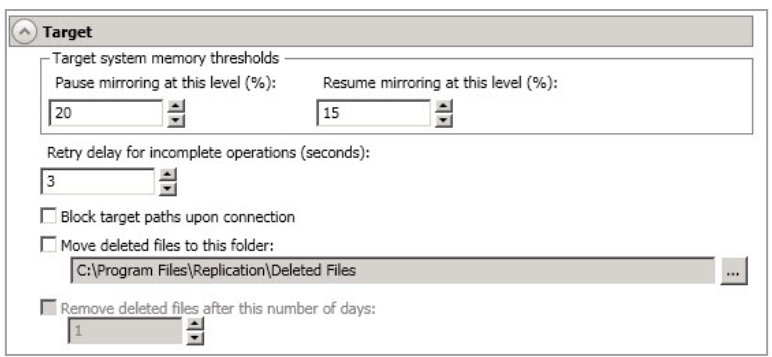
Pause Mirroring At This Level - You can specify the maximum percentage of Windows system memory that can contain mirror data before the target signals the source to pause the sending of mirror operations. The default setting is 20.
-
Resume Mirroring At This Level - You can specify the minimum percentage of Windows system memory that can contain mirror data before the target signals the source to resume the sending of mirror operations. The default setting is 15 You cannot set the resume value higher than the pause value.
-
Retry Delay For Incomplete Operations - This option specifies the amount of time, in seconds, before retrying a failed operation on the target. The default setting is 3.
-
Block target paths on connection—You can block writing to the replica source data located on the target. This keeps the data from being changed outside of SyncSafe Replication processing. After failover, any target paths that are blocked will be unblocked automatically during the failover process so that users can modify data on the target after failover. During restoration, the paths are automatically blocked again. If you failover and failback without performing a restoration, the target paths will remain unblocked.
-
Do not block your target paths if you are protecting an entire Server because system state data will not be able to be written to the target.
-
Be careful blocking target paths if you will be using SyncSafe Replication snapshots. You will have to unblock the paths before you can failover to a snapshot. Additionally, be careful when blocking target paths with backup software running on the target. You will need to unblock the paths to allow backup software to take snapshots or update archive bits.
-
-
Move Deleted Files To This Folder - This option allows you to save files that have been deleted, by moving them to a different location on the target. When a file deletion is replicated to the target, instead of the file being deleted from the target, the file is moved to the specified location. This allows for easy recovery of those files, if needed. If you enable this option, specify where you want to store the deleted files.
- If you are moving deleted files on the target and you have orphan files configured for removal (which is the default setting for most job types), do not move the deleted files to a location inside the replica data on the target. The deleted files that are moved will then be deleted by the orphan file functionality.
- Remove Deleted Files After This Number Of Days -If you are moving deleted files, you can specify a length of time, in days, to maintain the moved files. A moved file that is older than the specified number of days will be deleted/SyncSafe Replication checks for moved files that should be deleted once daily at 8 PM. Only the date, not the time, of the file is considered when moved files are deleted. For example, if you specify to delete moved files after 30 days, any file that is 31 days old will be deleted. Because the criteria is based on days and not time, a file that will be deleted could have been moved anytime between 12:01 AM and 11:59 PM 31 days ago.
- If deleted files are moved for long enough, the potential exists for the target to run out of space. In that case, you can manually delete files from the target move location to free space.
- Do not include the Recycler directory in your job if you are moving deleted files. If the Recycler directory is included, SyncSafe Replication will see an incoming file deletion as a move operation to the Recycle Bin and the file will not be moved as indicated in the move deleted files setting.
- Alternate data streams that are deleted on the source will not be moved on the target.
- Encrypted files that are deleted on the source will only be moved on the target if the move location is on the same volume as the copy of the source data on the target.
- Compressed and sparse files that are deleted on the source will be moved on the target, although the compression and sparse flags will only be retained on the target if the move location is on the same volume as the copy of the source data on the target.
Email Notification Configuration
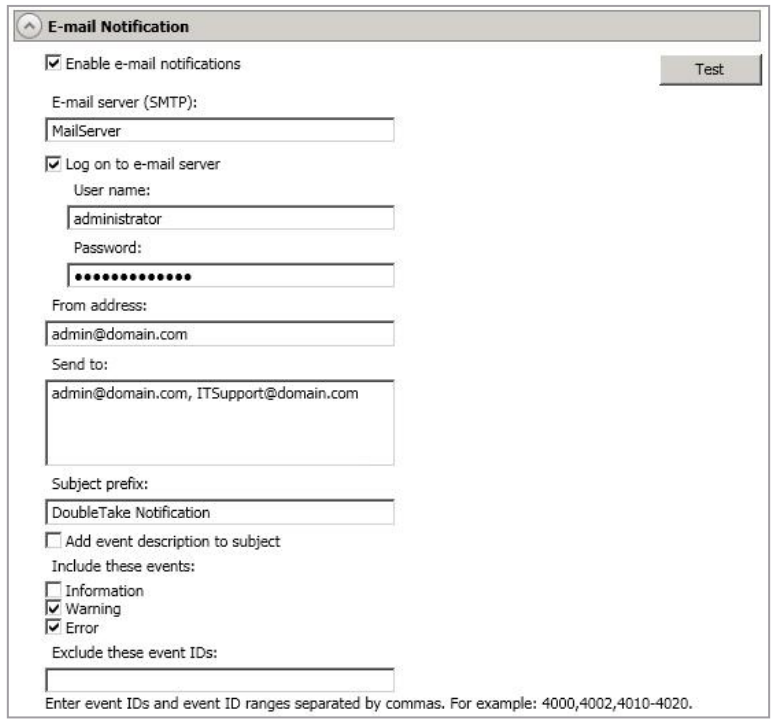
You can email SyncSafe Replication event messages to specific addresses using an SMTP mail Server. The subject of the e-mail will contain an optional prefix, the Server name where the message was logged, the message ID, and the severity level (information, warning, or error). The text of the event message will be displayed in the body of the e-mail message.
-
Enable E-Mail Notification - This option enables the e-mail notification feature. Any specified notification settings will be retained if this option is disabled.
-
E-Mail Server - Specify the name of your SMTP mail Server.
-
Log On To E-Mail Server - If your SMTP Server requires authentication, enable this option and specify the User name and Password to be used for authentication. Your SMTP Server must support the LOGIN authentication method to use this feature. If your Server supports a different authentication method or does not support authentication, you may need to add the SyncSafe Replication Server as an authorized host for relaying e-mail messages. This option is not necessary if you are sending exclusively to e-mail addresses that the SMTP Server is responsible for.
-
From Address - Specify the e-mail address that you want to appear in the From field of each SyncSafe Replication e-mail message. The address is limited to 256 characters.
-
Send To - Specify the e-mail addresses that each SyncSafe Replication e-mail message should be sent to. Enter the addresses as a comma or semicolon separated list. Each address is limited to 256 characters. You can add up to 256 e-mail addresses.
-
Subject Prefix And Add Event Description To Subject - The subject of each e-mail notification will be in the format Subject Prefix : Server Name : Message Severity : Message ID : Message Description. The first and last components (Subject Prefix and Message Description) are optional. The subject line is limited to 100 characters.
-
If desired, enter unique text for the
Subject Prefixwhich will be inserted at the front of the subject line for each SyncSafe Replication e-mail message. This will help distinguish SyncSafe Replication messages from other messages. This field is optional. -
If desired, enable
Add Event Description To Subjectto have the description of the message appended to the end of the subject line. This field is optional.
-
-
Includes These Events - Specify which messages that you want to be sent via e-mail. Specify
Information, Warning, and/or Error. You can also specify which messages to exclude based on the message ID. Enter the message IDs as a comma or semicolon separated list. You can indicate ranges within the list.Note
E-mail notification will not function properly if the Event logs are full.
-
When you modify your e-mail notification settings, you will receive a test e-mail summarizing your new settings. You can also test e-mail notification by clicking
Test. By default, the test will be run from the machine where the console is running. If desired, you can send the test message to a different e-mail address by selectingSend Toand entering a comma or semicolon separated list of addresses. Modify theMessage Textup to 1024 characters, if necessary.Click Send to test the e-mail notification. The results will be displayed in a message box. -
If an error occurs while sending an e-mail, a message will be generated. This message will not trigger another e-mail. Subsequent e-mail errors will not generate additional messages. When an e-mail is sent successfully, a message will then be generated. If another e-mail fails, one message will again be generated. This is a cyclical process where one message will be generated for each group of failed e-mail messages, one for each group of successful e-mail messages, one for the next group of failed messages, and so on.
-
If you start and then immediately stop the Double-Take service, you may not get e-mail notifications for the log entries that occur during startup.
-
By default, most anti-virus software blocks unknown processes from sending traffic on port 25. You need to modify the blocking rule so that SyncSafe Replication e-mail messages are not blocked.
Script Credentials
These credentials will be used when executing custom scripts for mirroring and failover.
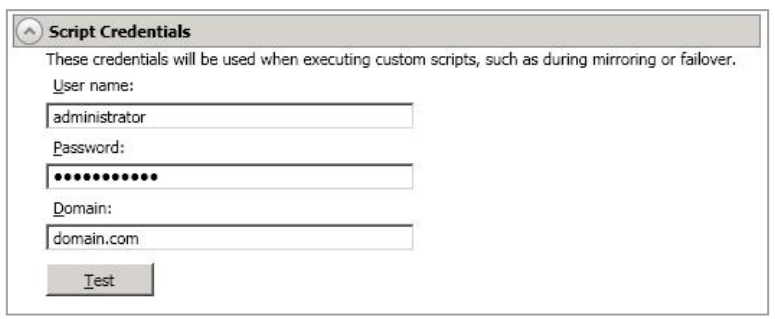
- Specify a
Username, Password, and Domainto use when running the scripts. If you do not specify any security credentials, the account running the Double-Take service will be used. After you have specified credentials, you can clickTestto confirm the credentials can be used for a successful login. It the credentials cannot be authenticated, you will receive an error. You will need to manually test that credentials you supply have appropriate rights to execute any scripts you may be running.
Log File Properties
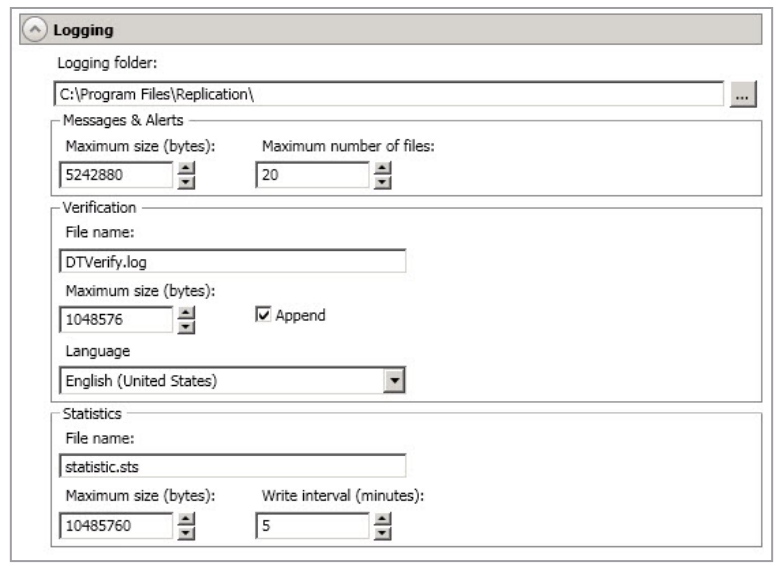
These properties allow you to control various options relating to the log files created by SyncSafe Replication.
-
Logging Folder - Specify the directory where each of the log files in this section are stored. The default location is the directory where the SyncSafe Replication program files are installed.
-
Messages & Alerts - These settings apply to the service log file.
-
Maximum Size - Specify the maximum size, in bytes, of the log file. The default size is 5242880 bytes (5 MB). Once the maximum has been reached, a new log file will be created.
-
Maximum Number Of Files - Specify the maximum number of log files that are maintained. The default is 20, and the maximum is 999. Once the maximum has been reached, the oldest file will be overwritten.
-
-
Verification—The verification log is created during the verification process and details which files were verified as well as the files that are synchronized.
-
File Name - This field contains the base log file name for the verification process. The job type and a unique identifier will be prefixed to the base log file name. For example, since the default is DTVerify.log, the verification log for a files and folders job will be Files and Folders_123456abcdef DTVerify.log.
-
Maximum Size - Specify the maximum size, in bytes, of the verification log file. The default is 1048576 bytes (1 MB).
-
Append - Enable the Append check box if you want to append each verification process to the same log file. If this check box is disabled, each verification process that is logged will overwrite the previous log file. By default, this option is enabled.
-
Language - Select the language for your verification log file.
-
-
Statistics - The statistics log maintains connection statistics such as mirror bytes in queue or replication bytes sent. This file is a binary file that is read by the DTStat utility. See Reference Guide for details on DTStat (to be linked).
- File name—This is the name of the statistics log file. The default file name is statistic.sts.
- Maximum size—Specify the maximum size, in bytes, of the statistics log file. The default is 10485760 bytes (10 MB). Once this maximum has been reached, the oldest data will be overwritten.
- Write interval—Specify how often, in minutes, SyncSafe Replication writes to the statistics log file. The default is every 5 minutes.